Audit Log
Note: Access to the audit log is restricted to Administrators, or if your user account is granted membership of one of the roles as explained below.
There is a single audit log for the Planning Space tenant, which records system events and user activities for all of the Planning Space and CX Suite applications.
However, there are several points of access, and slight differences in the information content, as explained below. The Audit Log web interface contains the fullest information.
For version 16.5 Update 11 and later: API login events and some API interactions are recorded in the audit log. See the Planning Space Web API Guide (Audit Log API logging).
Note: In a clustered deployment it is essential to configure the load balancer for "X-Forwarded-For" headers because these headers are used to determine the 'Machine Name' information in Audit Log entries (otherwise the load balancer's address will be inserted).
Audit Log web interface
Note: Access to the Audit Log web interface requires a user account to be granted the role 'Configuration/Audit Logs' (see Roles).
Note: The Audit Log interface is part of the 'PlanningSpace Web' user interface. By default this is hidden from users; a PlanningSpace Web launch button can be enabled by the Administrator for your Planning Space tenant (with the setting 'Preview Web Features', see Tenant Settings). Otherwise, you can use a URL to directly access the Audit Log web page.
Login to your Planning Space tenant website (see Launch Planning Space).
Then you should be able to connect directly to the Audit Log page with the URL:
https://SERVERADDRESS/TENANTNAME/PlanningSpace/#/system/log
with your own values for 'SERVERADDRESS' and 'TENANTNAME' inserted.

Click the column headings to change output ordering, or to set up display filters. Use the Search box to specify any text that matching records must contain.
In the Start date and End date fields, you can set the date range for the records to be displayed. Use the records drop-down to set the number of records to be displayed.
To refresh the log for the latest events, or if you change the date range, click the Load button.
The table below describes the fields in the web-based Audit Log display:
| Column | Description |
|---|---|
| Application | The Planning Space application involved in the event |
| Comment | Description of the action |
| Entity Name | The name of the entity involved |
| Entity Type | The type of entity involved (for example, a user account or a workgroup) |
| Action | The type of action that occurred for the entity (Created, Deleted, Updated, Login, Logout, etc.) |
| User Name | The user who owned or caused the event |
| Machine Name | The machine name (or IP address) where the user was logged in, when the event was triggered |
| Timestamp | The timestamp for the event |
Audit logs can be exported to a CSV-format file using the Export as CSV button. A file named 'AuditLog.csv' will be downloaded to your browser. The exported file will contain all of the log entries with timestamp values within the specified date range, irrespective of the current records setting.
Audit Log access from the Planning Space applications
The table summarises how this Audit Log interface can be accessed from the different applications:
| Application | Access location | Role required for access |
|---|---|---|
| Dataflow | Dataflow Configuration workspace | Configuration/Audit Logs |
| Economics | Economics Configuration workspace | Economics/Audit Logs |
| Financials | Financials Configuration workspace | Financials/Audit Logs |
| CX Suite: PalantirCASH and PalantirFINANCIALS | Tools > Database Maintenance > Audit Log | PalantirCASH/Audit Log |
This Audit Log application-based view differs from the web-based view in several ways: there is no Machine Name field, the ordering of the columns is different, and the Action labels typically include the entity type as well (for example, 'User Logout' instead of 'Logout').
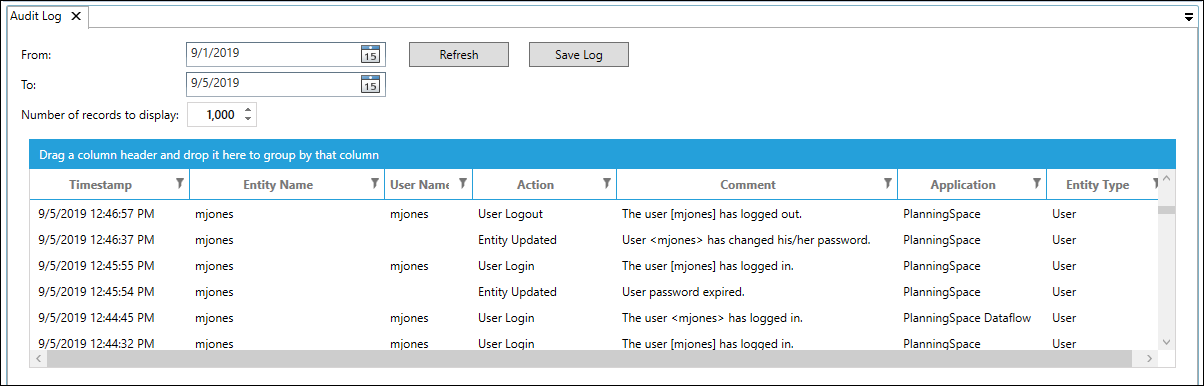
In the From and To fields, you can set the date range for the records that will be displayed (the default is from yesterday to now). The Number of records to display field sets the maximum of records that will be retrieved from the server for the specified date range; it is set to 1000 by default (and the maximum value is 10,000). You may need to increase from the default value to see all of the records for the current From/To range.
Note: If you request to display a large number of log entries (above several thousand) this can slow down or 'freeze' the Planning Space application. For this reason you cannot request more than 10,000 records in a single request. It is recommended to use the filter buttons in the column headers to focus your data search and reduce the number of records retrieved from the server. (In general to retrieve large amounts of audit log data you are recommended to use the Planning Space Web API and the method 'PlanningSpace/api/v1/auditlogs'.)
To refresh the log for the latest events, or if you change the date range, click the Refresh button.
The table below describes the columns in the application Audit Log display. Each column has a filter button which restricts the data that will be shown.
| Column | Description |
|---|---|
| Timestamp | The timestamp for the event |
| Entity Name | The name of the entity involved |
| User Name | The user who owned or caused the event |
| Action | The type of action that occurred for the entity (Created, Deleted, Updated, Login, etc.) |
| Comment | Description of the action |
| Application | The Planning Space application involved in the event |
| Entity Type | The type of entity involved (for example, a user account or a workgroup) |
Click the column headings to change output ordering, or to set up display filters. If you drag a column header up into the blue bar, the list of records will be grouped by the values in that column, for example the events associated with each individual user account; drag the column header out of the blue bar to reset the display; you can drag multiple headers to produce a hierarchical view of the logs.
Audit logs can be exported to a CSV-format file using the Save log button. A file system dialog opens to select the location and filename for the file to be saved; by default this is set to a file on the Desktop. The exported file will contain all of the log entries with timestamp values within the specified From/To date range, irrespective of the current setting in Number of records to display.